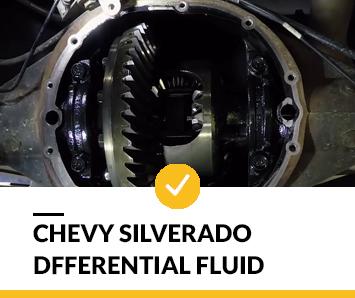
Whether your Chevrolet Silverado is front-wheel drive, rear-wheel drive, or all-wheel drive, it has one or more differentials that direct engine power to the wheels. This is accomplished using precise gears that require regular lubrication. The differential oil will wear out and need to be changed after a while, just like every other automobile fluid. Our technicians at Capitol Chevrolet will replace the fluid in your front, center, and/or rear differential with factory-approved differential fluid so you know your car is kept up to date with the best.
The differential’s goal is to distribute engine power to the axles so that the wheels are turned correctly and at the required speed. The differential also allows for variation in the rotational speeds of the front wheels as vehicle corners. When turning, the inside wheel spins slower than the outside wheel; this “difference” is what gives rise to its name.
When getting their car’s oil changed, many drivers are asked if they want to “service their differential.” While this may appear to be a trick designed to get you to purchase additional items from the dealership or shop where you have your vehicle serviced, it is not. Is it truly necessary to replace the differential fluid in your Silverado?
How does a differential work?
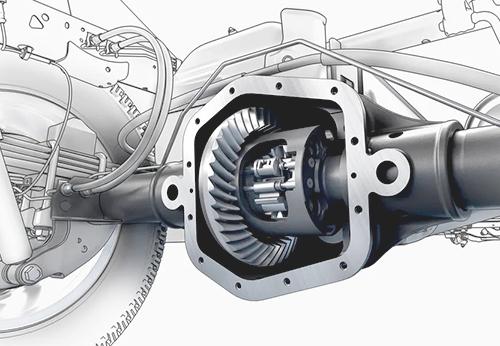
When driving through a turn or bend, the inside drive wheel – nearest to the corner’s interior – travels less than the outside wheel. If the wheels were rotating at the same speed, the vehicle would easily fishtail around the curve, but having a differential between them prevents it from doing so.
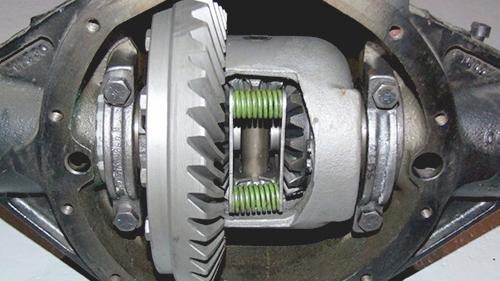
A differential is a gearbox that allows the wheels to spin independently, and it contains a cluster of gears that spin the wheels independently. However, in order for these components to move more freely and not heat up too much as a result of the continual friction, they require differential fluid in the housing. If this fluid isn’t changed at the specified intervals by the manufacturer, it can become dirty and thick, which may damage the differential over time. You don’t want to spend money on a new differential.
Avoid driving a car with a severely low level of gear oil in the differential. The differential, drive shaft, U-joints, and drive axles are all at risk of damage. If there is only a little leak that is detected early, driving the vehicle should not cause any problems.
The differential oil does the same important function as the oil in your engine: to keep metal-on-metal parts well lubricated. If your differential fluid is not changed for a long time, you run the risk of more severe and costly problems. That’s because time and regular driving will cause the differential oil to become less efficient, resulting in excessive heat and friction that can cause damage.
What Is Differential Fluid And Why Is It Important?
Differential oil is a kind of lubricant that is used in automobile engines. The purpose of differential fluid is to guarantee a smooth transition of power from the engine to the wheels and consistent vehicle length between the outside and inside wheels. Off-road driving is made easier with better suspension stability, particularly on twists and turns.
“What exactly is a differential?” you might ask. If you’ve ever seen a huge box between the cargo van’s or truck’s rear axle, you’ve witnessed where the differential fluid is kept and what it does. On the outside, this fluid has the same color as engine oil and a similar viscosity.
The following benefits result from the presence and timely replacement of your differential fluid:
- Better traction on the road.
- Your vehicle gets smoother and more responsive.
- Rotations and turns are less jerky.
Differential Fluid Problem Symptoms
When a differential is low on gear oil, it makes a lot of noise. A constant rattling of cogs while driving will be an indication that something is wrong. In addition, the traction control light may come on in some cars, and there may be a loud slapping sound when “D” or “R” is selected.
How Often to Change Differential Fluid
Differential Fluids have an outstanding shelf life. Differential fluid has a greater anticipated lifespan than most other fluids. Although the life of differential fluid is unpredictable, it is rarely filtered. After every 30k to 60k miles driven, your car’s differential fluid must be changed. Only an expert specialist can clean out the old different fluid from your vehicle’s drivetrain properly.
It’s critical not to mix the old fluid with the new. To save time, make an appointment online. If it’s more convenient for you, call our service center right now! Check your vehicle’s service handbook to see what Differential Fluids are appropriate for your car.
Silverado Differential Fluid Type
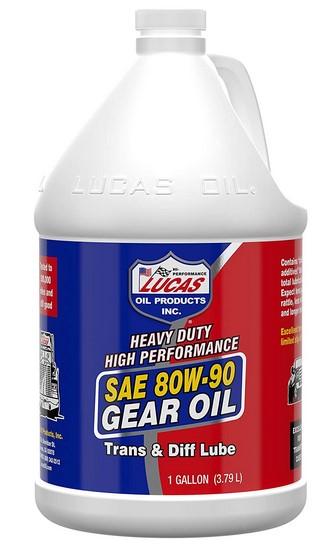
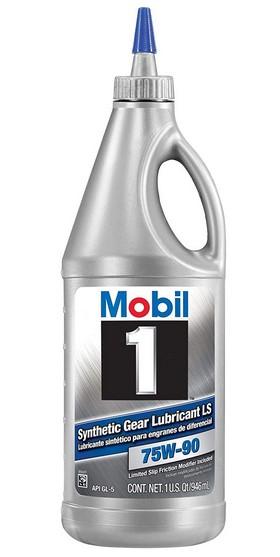
The Silverado’s rear axles are standard and steerable, as well as available. The conventional rear axle requires 75W-90 synthetic gear oil. Because the steerable rear axle is constructed of plastic, it requires synthetic gear oil, just like the standard axle. GM recommends using its own brand of oil – part No. 12378557 – for this application. The 2005 Silverado with four-wheel drive uses 80W-90 gear oil. Only 75W-90 synthetic all-wheel drive front axle gear oil should be used, according to GM.
Because the fluid was not filled to a specific level at the factory, it may appear low, according to GM’s Factory Owner’s Manual. To obtain an accurate reading of the fluid, allow the automobile to sit on a level surface for an hour or more after filling it. GM provides the following fill levels:
For all 4.3L and 5.3L 1500 Series applications, the proper level is 1.0 mm to 19.0 mm (0.04 in to 0 on the bottom of the fill hole located on the rear axle) below the bottom of the fill hole on the rear axle. Only enough fluid should be added to reach a suitable level.
The proper level for 6.2L 1500 Series applications is between 15 mm and 40 mm (0.6 in and 1.6 in) below the bottom of the fill plug hole on the rear axle, which is located on some models. Only enough fluid should be added to enable you to reach the required level.

For all 6.0L 2500HD Series applications, the proper level is from 13 mm (0.5 in) to 0 mm (0 in) below the bottom of the fill plug hole on the rear axle. Just enough fluid should be added to reach the correct level.
The right amount of fluid should be added so that the bottom of the fill plug hole on the rear axle is between 17 mm and 21 mm (0.6 in to 0.8 in) below the liquid level inside. Only enough liquid should be added to reach the correct level.
This process is identical for:
- Chevy Silverado
- Chevy Tahoe
- Chevy Sububan
- GMC Sierra
- GMC Yukon
How to Change Front and Rear Silverado Differential Fluid
Your Chevy’s differential, which operates in conjunction with your gearbox, transforms the wheels. Rear-wheel drive vehicles have only rear differential fluid. Front-wheel drive and 4-wheel drive vehicles, on the other hand, feature front differentials as well. To keep the components within your differential lubricated and operational effectively, differential oil or gear oil is added to it. The front diff fluid in your Chevrolet should be changed every 60,000 to 70,000 miles if necessary.
Changing the differential fluid is almost as simple as changing the engine oil. However, the procedure varies slightly depending on vehicles since some differentials only have two connections: one for filling the fluid and another for draining it. Other vehicles, on the other hand, require you to remove the housing cover. The following is a simplified version of how to perform this operation:
Here is what you will need:
- 3 quarts of gear lube (verify capacity of your truck to be sure; mine needed 2.4)
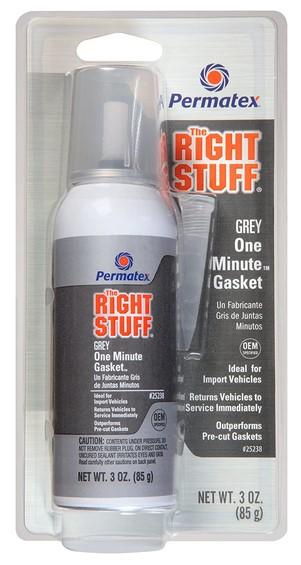
- Differential gasket
- Socket wrench
- Shop rags or paper towels
- Lube pump
How to do step-by-step
Before we get started, there are a few points you should know. First and foremost, automobile differential fluid is by far the most foul-smelling liquid in your car; good ventilation would be extremely helpful. It’s a pungent sulfur smell that you’ll immediately recognize if you encounter it; if you detect it, there’s a problem. If you’re working in a confined garage, use a box fan to keep the air in your workspace fresh. Second, this procedure will proceed at a deliberate pace and take measures to avoid an unpleasant leak because the more work will do so. This isn’t the quickest approach; this is the correct solution.
- Set the parking brake and park on a flat surface.
- Jack up the rear of the car on suitable jack points. Set up jack stands. Front wheels should be chocked.
- Before draining the fluid, remove the fill bolt. If your differential housing has a drain plug, place a catch pan under it and unfasten the drain valve. Some cars have a rubber stopper, making the process considerably easier. Replace the fill plug after the fluid has completely drained out. Fresh fluid should be poured in and the car lowered once again. Continue to step 4 without removing any additional components.
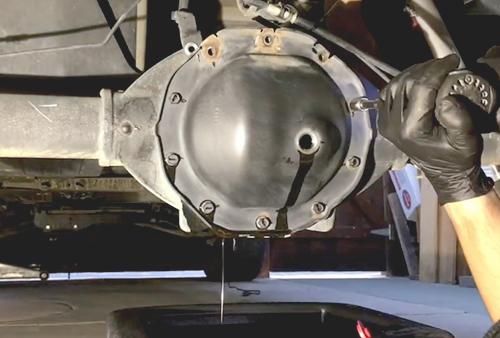
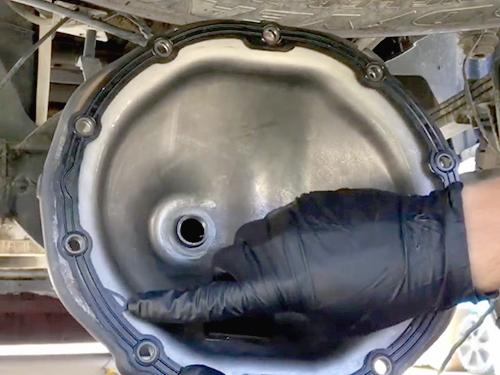
- Remove the differential fill plug on top of the differential housing, but be aware that it might require something unusual like a large torx bit or a half-inch box extension rather than a regular socket or wrench. Then just remove the top bolt loosely while removing the cover. The cover will stick to the housing, so pry it off with a pry bar or screwdriver while being careful not to bend it. Have an empty catch pan on hand and keep your distance when popping off the cover; otherwise, it may leak.
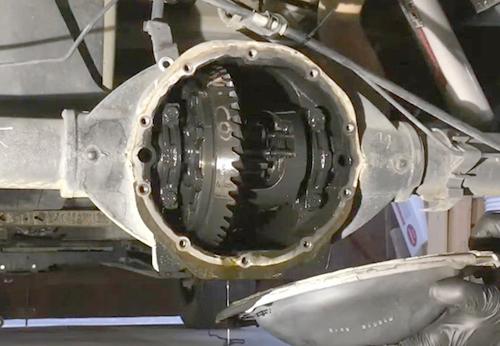
- The differential receives its oil from the gearbox. This will be messy, but don’t worry; you can clean it up easily after repairs are done. After draining the oil out of the bottom, wait a few minutes for it to drain completely. Then use brake cleaner to remove the rest of the mixture, taking precautions against overspray. Spray brake fluid inside the differential cover as well. Check all of the drained oil for metal shavings (there shouldn’t be any).
- Remove any remaining gasket remnants from the differential cover and housing mating surfaces with a scraper. Make sure the mating surfaces are completely clean of gasket debris—you don’t want to have to repeat this process because of a leak.
- To install a gasket, use a gasket maker on the differential cover. Place the differential cover with the interior surface up and lay down a continuous line of gasket maker along the center of the housing mating surface. Allow it to cure for a few minutes before pressing the cover onto the housing, which you’ll hold in place for another minute. Hand-tighten all of the cover bolts and let them sit for an hour before torquing to specification in an alternating star pattern.
- Align the bolt holes with the housing cover’s corresponding holes, and then insert a gasket (if applicable). Simply use gasket glue or any spray adhesive to secure it in place. Then, using the pattern above, attach the cover.
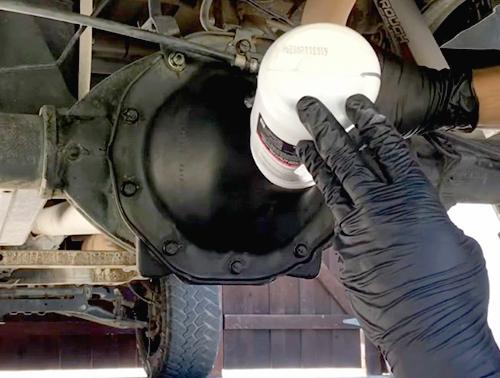
- Add the suggested fluid and/or limited-slip additive, if required. For easier filling, use a fluid pump. Replace the filler bolt and tighten to specification.
- Take it for a spin after lowering the car. Over the next week, look for leaks and check for any other problems that may have arisen as a result of the collision.
The procedure for draining differential fluid from cars and trucks with an entire differential housing cover is the same, although you’ll need to remove more bolts to empty the fluid. Use the correct fluid, as specified in your car’s owner’s handbook, unless otherwise directed by your manufacturer.
You can expect to see some discoloration and perhaps a film of oil on the windshield during the first few days after this procedure. We recommend checking for any leaks and the fluid level a week or two later to make sure everything is correctly aligned. You’ve completed it! Thank you very much!